Blog
With an extensive choice of block paving products and accessories available to order online from Marshalls, it’s easier than you may think to build your own driveway or path. When you’re doing the work yourself, knowing how to lay block paving correctly can help you get amazing results – and help you on the way to creating the home or garden of your dreams.
Here, we’ll show you just how to build a driveway or path by guiding you through the process of laying block paving with our step-by-step block paving guide.

Before you start – designing your path or driveway
It’s a good idea to sketch out a plan of your home or garden. It doesn’t have to be anything too detailed – just a simple map that’ll help you work out the dimensions of your path/driveway and where you’ll be laying pavers. It’ll also give you an idea of what materials you’ll need to order.
What do I need for laying block paving?
In terms of what you’ll need, there are two main things to think about – tools and materials.
For the tools, you’ll need:
- A broom and rake
- String line and some pegs
- Screed rails
- A shovel or spade
- A spirit level and tape measure
- A mallet
- A wheelbarrow
You’ll probably be able to find many of these tools in your garage, shed or home already. You’ll also need a cement mixer, a compacting tool and either a stone saw or a block splitter. You can rent these from any good hire shop near you.
For the materials, you’ll need:
- Sub-base aggregate
- Sand
- Block paving stones
TOP TIP: Plan ahead when buying your materials. Don’t start work until you have everything you need for building a new driveway.
How many block pavers do I need per M2?
By measuring out the area you plan to pave and the size of your chosen paving slabs or brick, you can work out how many block pavers to a square metre you’ll need. It’ll differ depending on which product you choose for your path or driveway.
What sand do you use for block paving?
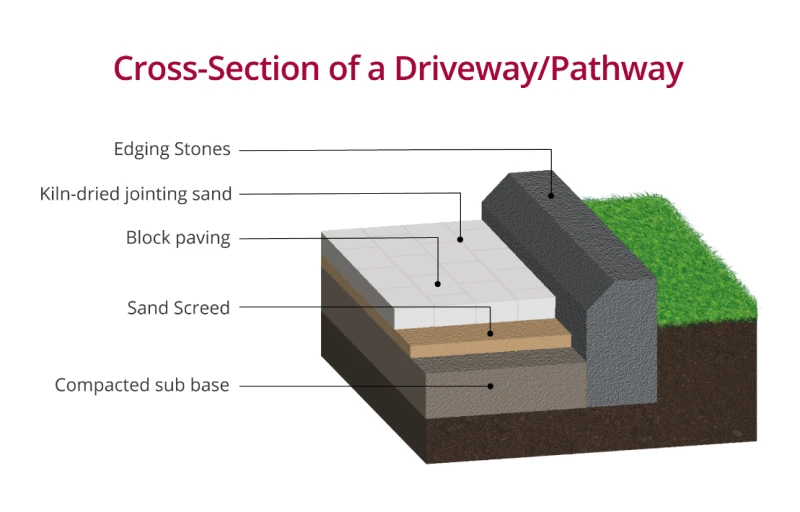
Kiln-dried sand is the best sand for block paving joints. It’s an extremely fine sand that’s been dried in a kiln to remove all the water before being used.
Do I need planning permission to lay block paving?
Is your new path/driveway going to cover an area that’s more than five square meters in size? Are you going to use traditional paving slabs that won’t let water drain through – or flow to an area such as a lawn or border to drain naturally?
If the answer to these questions is “yes”, you must now apply for planning permission to carry out the work after the government changed the permitted development rights in October 2008.
But you won’t have to apply if you plan to use materials that will let water through – including permeable block paving stones – or if you can direct surface water somewhere it can drain. For further advice if you’re unsure of your paving plans, the Planning Portal has more information.
How do I lay block paving?
Once you’ve got everything you need, mark out the area in which you’ll be laying block paving with string and pegs. A tape measure can help you make sure your measurements are correct. Then you’ll be ready to begin.

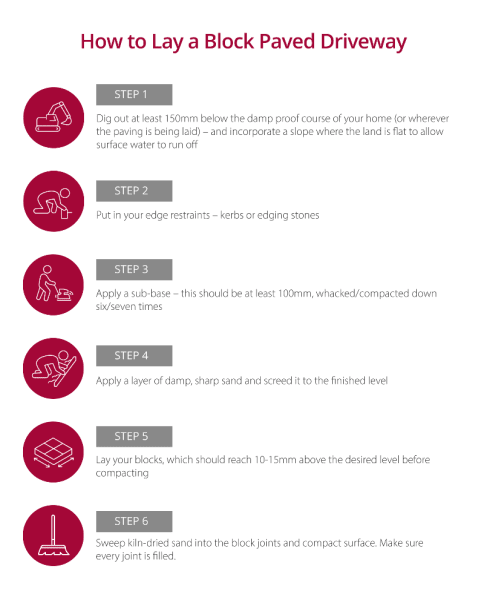
1. Excavation
Dig out the area to a depth of at least 150mm below the damp proof course of your home or whatever the paving is being laid next to. The depth you’ll need to dig to could change as you progress, depending on the rise and fall of the land.
To excavate the paving area, you’ll need your shovel or spade – but hiring a mini-excavator or JCB might help you save time, especially if you’re working across a large area.
Top Tip: If the land you’re excavating is completely flat, dig in a gradual slope so that surface water can drain away. We recommend a 1cm drop for every 60cm of length being paved.
2. Edge Restraints
Putting in your edge restraints right is hugely important and is the key to a creating a fabulous new driveway or path. And it’s important to do this before laying your block paving.
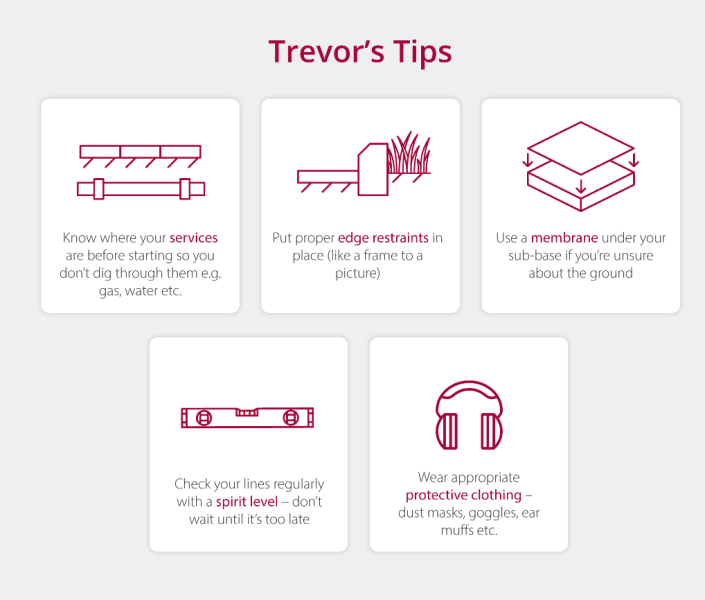
Marshalls paving specialist Trevor Knight explains why: “If you think of the kerbs and the edge restraints, they are like a frame to a picture. They’re framing your drive and holding it together. It's majorly important you do this bit properly because this is what gives your drive integrity.”
Use a concrete mix of one-part cement to six-part ballast to create foundations that are 100mm thick. Using a taut string line set at the finished height of your paving level to act as your guide, make sure the edging stones you’re using will sit at the level they need to be.
Mix the concrete 25mm below the line and place the edge course on top. Using a mallet, lightly hammer the kerb or blocks into place. Next, haunch in your edging by applying concrete to the outside of the edging stones – this should reach about halfway up the height of the block.
Top Tip: Use a spirit level to make sure your edge restraints are a nice even level when you’re hammering them into place with your mallet.
3. Sub-base
The sub-base is your main supporting layer of stone. For this, you’ll need to apply a layer that’s at least 100mm in depth. This is to make sure your paving can support the weight of what’s on top of it, whether it’s people or vehicles.
One way you can do this is by applying a 75mm layer, whacking it with a compacting plate and applying another 75mm layer. For your sub-base, use MOT Type 1 hardcore aggregate – usually made up of granite limestone or basalt crushed into stones measuring no more than 40mm.
“The hardcore gives stability to the drive and will stop sinking, dipping and give longevity on your drive for years to come,” says Trevor. “Do it properly, do it right, do it once.”
Top Tip: Use a compactor six or seven times to make sure you fully pack down the sub-base. Not doing this could result in an uneven finish when laying block paving.
Top Tip: If you’re not sure about the land on which you’re laying pavers, it can be a good idea to use a membrane that will stop the hardcore going into the sub-soil.
4. Laying and screeding sand
With your sub-base in place, the next step is to add sand. The reason for doing this is to make up the distance between the sub-base and the final paving line. It’s important to remember to mould the sand in a way that incorporates any slopes or angles you’re working with.
Apply a 50mm layer of damp sharp sand – it should be moist enough to compact, which you’ll be able to test by creating a ball of sand with your hand. If it doesn’t fall apart, it’s suitable to use. Once applied, use a vibrating plate compactor to compact it down and screed it.
Use screeding lats to get to the finished level where the blocks will be laid. To get to your top line, put a string line across – but leave it 3-5mm proud as the block will be compacted down.
Once you’ve found the right level, remove your lats and backfill the void with some more sand and screed it in the entire way along.
Top Tip: If using screeding lats, we suggest you use gas pipes or rail bars rather than timber. As Trevor explains, it’s because “timber is flexible and doesn't give it a nice finished surface.”
5. Laying your pavers
Sitting 3-5mm proud, start laying your pavers on the sand from one corner at the bottom of the slope you’ve created. If this isn’t possible, start from a straight edge or border.
Laying pavers one by one, place every block straight against the face you’re running from. Do this at least halfway up, making a connection and then running it straight down into place.
By taking the block and digging it straight into the sand, you’ll be left with a face that could leave gaps in the finished driveway or path.
Blocks should hit 10-15mm above the line you’ve planned, ready to be compacted as soon as the course has been completed.
Top Tip: If you’re left with a small number of blocks that need to be cut to complete the area, Trevor advises: “Get the block, take it to the side of the edge in detail, place it down and then strike a line down the blocks that are laid. Take it away, see the line, take the blocks out and then cut it. That way you get a complete size block straight into the side of the curb.”
6. Finishing touches
Once you’re done laying your block paving, it’s time to apply the finishing touches. Using your broom, brush the kiln-dried sand across the paving. Make sure plenty of it gets into the joints. Compact the paving and then add more sand – repeat this process until all joints are filled.

Prefer your block paving to be installed by an expert? Click here to find your nearest Marshalls-accredited installer.
Download our guide to the most popular garden patio designs and see for yourself how a small patio doesn’t have to mean a small sense of character.


